Gatsby is an open-source framework based on React that helps build websites and apps. It allows you to build your website and apps using React and then generates HTML, CSS, and JS when you build for production.
One of the many advantages of using Gatsby is that it allows accessing data through a query language called GraphQL. GraphQL is a query language for APIs that provides a complete and understandable description of the data in your API, gives clients the power to ask for exactly what they need and nothing more. Gatsby uses GraphQL because it provides the following:
- Specificity: Request only the data needed and not whatever is returned by the API.
- Static Build: Perform data transformations at build time within GraphQL queries.
- Standardized: It's a performant data querying language for the often complex/nested data dependencies.
If you are interested, you can read more about why Gatsby uses GraphQL. In this article, I'll share some useful tips for when using GraphQL in a Gatsby project.
Create Gatsby Pages from GraphQL Query
By default, pages/routes in Gatsby are created by creating a new file in the src/pages folder i.e creating an about.js file means creating a page at /about. However there's another method to creating pages, and that's using the createPage action in conjunction with the createPages API to programmatically create pages. This method also provides you with more options when creating these pages such as customizing the page's slug.
// gatsby-node.jsconst path = require('path')exports.createPages = ({ graphql, actions }) => {const { createPage } = actionsconst ShopPage = path.resolve(`src/components/shop-page.js`)createPage({path: "/store",component: ShopPage,context: {},})}
In the code snippet above, the createPage action is used to create a page at /store. The createPage action accepts multiple arguments but I'll focus on the following arguments:
path- This is the relative URL of the page and should always start with a slash.component- This is the path to the React component which is used as template for this page.context- This is an object that can contain any data to be passed down to the React component as props.
Essentially createPage helps us everywhere where we need to create pages dynamically. A more practical use for the createPage action would be creating multiple pages for each article in a publication website. It's the best method for this use case because it allows creating multiple pages programmatically from an external source. It's also a good option because we could use the data gotten from the external source to create permalinks/paths for the pages. Let's take a look at an example:
// gatsby-node.jsconst path = require('path')exports.createPages = ({ graphql, actions }) => {const { createPage } = actionsconst ArticlePage = path.resolve(`src/components/article-page.js`)return new Promise((resolve, reject) => {resolve(graphql(`{articles: allArticles {edges {node {idslugtitlecategory {slug}}}}}`,).then(result => {result.data.articles.edges.forEach(edge => {createPage({path: `${edge.node.category.slug}/${edge.node.slug}`,component: ArticlePage,context: {slug: edge.node.slug},})})}),)}
In the code above, we're querying a (fictional) external GraphQL source to fetch article entries. The query body contains the properties that we'd want to be returned in the result which would be useful in constructing the permalink.
The result gotten back from the query is then used to create the pages by looping through the result and using the article's property to create a path for the page.
Another useful tip for when creating pages programmatically is extracting the createPage actions just in case they are a lot for the gatsby-node.js file. It helps to declutter the file and make the code more readable.
This usually happens when there are multiple queries and multiple pages to be created. See the code snippet below as an example:
// gatsby-node.jsconst path = require('path')exports.createPages = ({ graphql, actions }) => {const { createPage } = actionsconst ArticlePage = path.resolve(`src/components/article-page.js`)const AuthorPage = path.resolve(`src/components/author-page.js`)const ProductPage = path.resolve(`src/components/product-page.js`)return new Promise((resolve, reject) => {resolve(graphql(`{articles: allArticles {edges {node {idslugtitlecategory {slug}}}}authors: allAuthors {edges {node {idslugnamebio}}}products: allProducts {edges {node {idslugtitle}}}}`,).then(result => {result.data.articles.edges.forEach(edge => {createPage({path: `${edge.node.category.slug}/${edge.node.slug}`,component: ArticlePage,context: {slug: edge.node.slug},})})result.data.authors.edges.forEach(edge => {createPage({path: `${edge.node.slug}`,component: AuthorPage,context: {slug: edge.node.slug},})})result.data.products.edges.forEach(edge => {createPage({path: `${edge.node.slug}`,component: ProductPage,context: {slug: edge.node.slug},})})}),)}
The code snippet above is similar to the first one we created, with the addition of more queries to fetch more data. If we continue adding queries and createPage actions at this rate, the gatsby-node.js would become cluttered and a very long file to scroll through.
A possible fix would be to extract the createPage actions to individual files for each of the pages that you'd like to create in the Gatsby project. This means creating page-specific helpers to manage each page, rather than putting all pages in the same place. The end result should be that the file is pretty declarative for each Gatsby hook that it implements:
// createArticlePages.jsconst path = require('path')module.exports = (createPage, edge) => {const ArticlePage = path.resolve(`src/components/article-page.js`)createPage({path: `${edge.node.category.slug}/${edge.node.slug}`,component: ArticlePage,context: {slug: edge.node.slug},})}
// createAuthorPages.jsconst path = require('path')module.exports = (createPage, edge) => {const AuthorPage = path.resolve(`src/components/author-page.js`)createPage({path: `${edge.node.category.slug}/${edge.node.slug}`,component: AuthorPage,context: {slug: edge.node.slug},})}
// createProductPages.jsconst path = require('path')module.exports = (createPage, edge) => {const ProductPage = path.resolve(`src/components/product-page.js`)createPage({path: `${edge.node.category.slug}/${edge.node.slug}`,component: ProductPage,context: {slug: edge.node.slug},})}
The three code snippets above are page-specific helper functions; createArticlePages, createAuthorPages, and createProductPages which will help to create the article pages, author pages, and product pages respectively. They also accept an argument of the createPage action itself and an edge object that contains the data needed for creating the path.
The new helper functions can then be used in the gatsby-node.js file like this.
// gatsby-node.jsimport createArticlePages from './createArticlePages'import createAuthorPages from './createAuthorPages'import createProductPages from './createProductPages'exports.createPages = ({ graphql, actions }) => {const { createPage } = actionsreturn new Promise((resolve, reject) => {resolve(graphql(`{articles: allArticles {edges {node {idslugtitlecategory {slug}}}}authors: allAuthors {edges {node {idslugnamebio}}}products: allProducts {edges {node {idslugtitle}}}}`,).then(result => {result.data.articles.edges.forEach(edge => {createArticlePages(createPage, edge)})result.data.authors.edges.forEach(edge => {createAuthorPages(createPage, edge)})result.data.products.edges.forEach(edge => {createProductPages(createPage, edge)})}),)}
This implementation helps to make sure that the gatsby-node.js file remains decluttered and easy to read.
Page query vs StaticQuery
Gatsby provides you with two methods for fetching data using GraphQL - Page Query and StaticQuery. Page query is a method that allows you to use the graphql tag in your React components to fetch data. The StaticQuery is a method in which you can the useStaticQuery React Hook to perform queries in your React component:
// example of a page query// article-page.jsimport { graphql } from 'gatsby'import React from 'react'const ArticlePage = ({ data }) => {return ({data.edges.map(article, index) => (<h2>{article.title}</h2><p>{article.snippet}</p>)})}export default ArticlePageexport const query = graphql`query Articles($locale: String!) {articles: allArticles(filter: { locale: { eq: $locale } }) {edges {node {idtitlesnippetlocalepublishDate}}}}`
// example of a static query// article-page.jsimport { graphql, useStaticQuery } from 'gatsby'import React from 'react'const ArticlePage = ({ data }) => {const data = useStaticQuery(graphql`query Articles {edges {node {idtitlesnippetlocalepublishDate}}}`)return ({data.edges.map(article, index) => (<h2>{article.title}</h2><p>{article.snippet}</p>)})}export default ArticlePage
The main difference between both methods is that page queries have access to the page context, which is defined during the createPage and this essentially means that page queries can accept GraphQL variables. Static queries do not have this feature.
Another difference between them is that static queries can be used anywhere in any component but page queries can only be used on pages which are used as component property in the createPage function.
Using GraphQL fragments in Gatsby
When using GraphQL in Gatsby, it's most likely you'll be in a scenario where you've used a particular query a couple of times across multiple components. Luckily there's a feature in GraphQL called fragments that allow you to create a set of fields and then include them in queries where they'd be used.
Fragments also help to convert complex queries into much smaller and modular queries. In a way it's similar to exporting a function from a helper file and then reusing that function in multiple components:
// AuthorInfo.fragment.jsexport const query = graphql`fragment AuthorInfo on AuthorEntry {idnamesluglocale}`
The code snippet above is an example of a fragment file in a Gatsby project. The query above fetches details about an author and we're assuming that this query has been written a couple of times throughout the codebase.
Fragments can be created in any GraphQL query but I find it better to create the query separately in a new file. There are 3 key elements in a fragment; the fragment's name, the GraphQL type it will be used on and the actual body of the query.
Using the example above, AuthorInfo is the name of the fragment and what will be used to reference it in other components. AuthorEntry is the GraphQL type and the body is the object values.
Once you have this file created, all you need to do is use the fragment anywhere in the Gatsby project:
// ArticlePage.jsimport { graphql } from 'gatsby'import React from 'react'const ArticlePage = ({data}) => {// Use the `data` property here...}export const query = graphql`query FetchArticle {article {idslugtitlepublishDateauthor {...AuthorInfo}}}`
There's no need to import the file or fragment before using it because Gatsby already knows to preprocess all GraphQL queries whilst compiling the site.
GraphQL Fragments in Gatsby with TypeScript
If you use TypeScript in your Gatsby project, you can also define types when creating your GraphQL fragment. This means that wherever you would use your fragment, you can use its type to ensure that you're getting what's expected. Using the code snippet below as an example:
// AuthorInfo.fragment.tsimport { graphql } from 'gatsby'export interface AuthorInfoFragment {id: stringname: stringslug: stringtwitter: stringlocale: string}export const query = graphql`fragment AuthorInfo on AuthorEntry {idnamesluglocale}`
In the code snippet above, there's a GraphQL fragment called AuthorInfo and an interface called AuthorInfoFragment, both of which are exported. These two can then be used in another component to query GraphQL and check for type safety respectively. Using the code snippet below as an example, we are trying to fetch an article entry using the GraphQL query at the bottom.
// ArticlePage.tsximport { graphql } from 'gatsby'import React from 'react'// Import the TypeScript interface from the fragment fileimport { AuthorInfoFragment } from 'AuthorInfo.fragment.ts'interface Props {data: {article: {id: stringslug: stringtitle: stringpublishDate: stringauthor: AuthorInfoFragment}}}const ArticlePage = ({data}) => {// Use the `data` property here...}export const query = graphql`query FetchArticle {article {idslugtitlepublishDateauthor {...AuthorInfo}}}`
Included in the query is the author property which uses the AuthorInfo fragment, and we're also type-checking the content of author in the Prop TypeScript interface.
GraphQL Playground for Gatsby
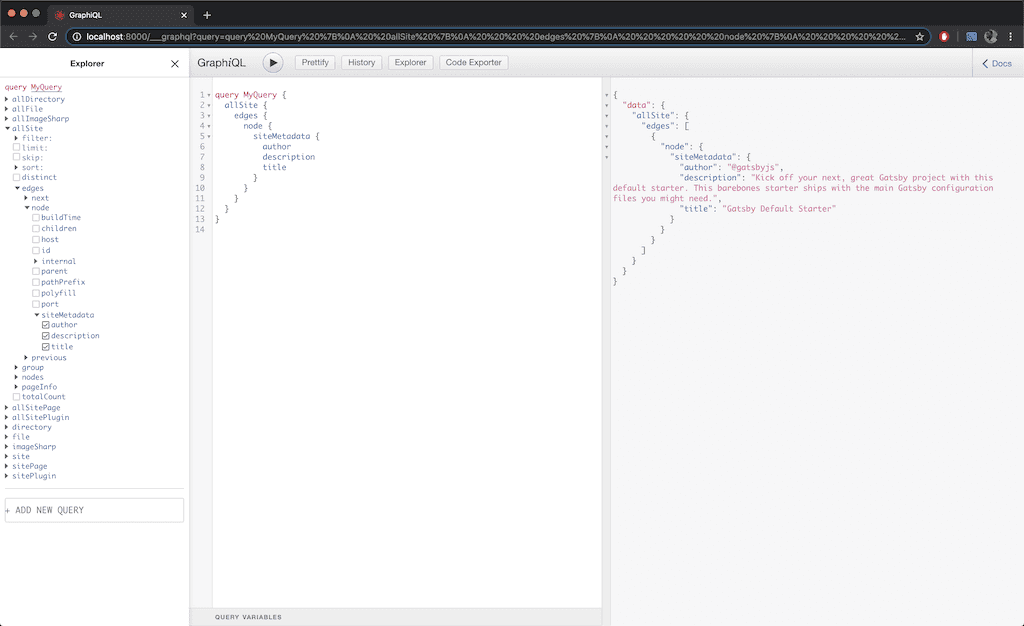
Whenever you run your Gatsby site in development mode, it also launches GraphiQL, an in-browser IDE, to explore your site's data and schema at localhost:8000/___graphql:

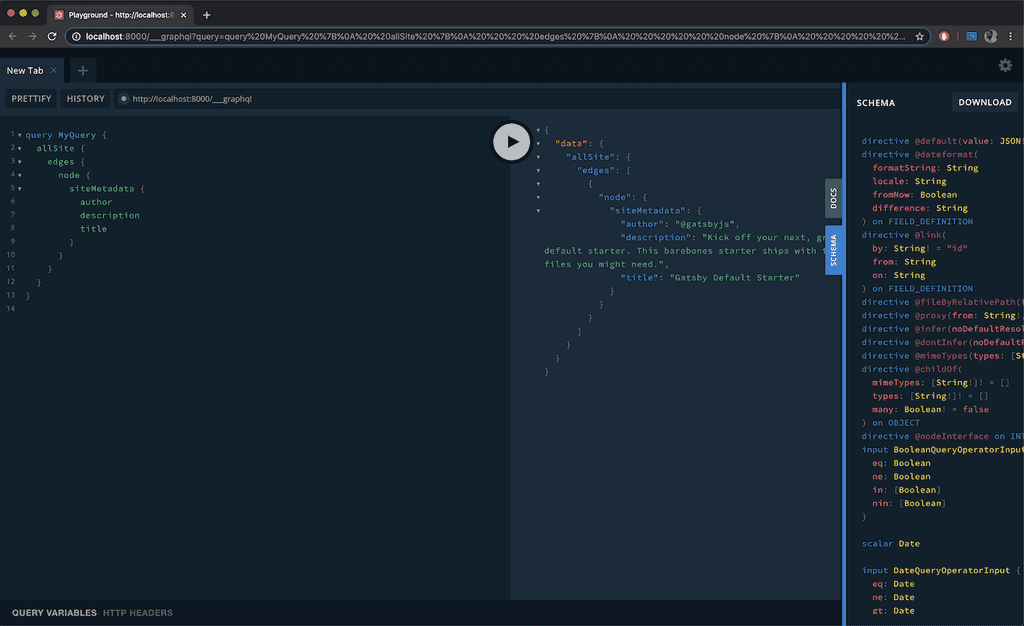
However, there's an alternative to GraphiQL, and that's the GraphQL Playground by Prisma. It allows you to interact with all the data, schemas added by additional Gatsby plugins. GraphQL Playground uses components of GraphiQL under the hood but is essentially a more powerful GraphQL IDE that enables better development workflows. The GraphQL Playground also adds additional features like:
- Interactive, multi-column schema documentation.
- Multiple Tabs just like you'd have in an IDE.
- Customizable HTTP headers.
- Query history.
To use the GraphQL Playground in your Gatsby project, edit the develop script in the package.json file:
// package.json"develop": "GATSBY_GRAPHQL_IDE=playground gatsby develop",
If you're on Windows then the script should look like this and also install the cross-env package:
// package.json"develop": "cross-env GATSBY_GRAPHQL_IDE=playground gatsby develop"
Once you've modified the script, you can then run yarn develop to run the site in development mode and also launch the new GraphQL Playground.

These are some of the things I've learnt whilst working with Gatsby and GraphQL and you can read more about both technologies here. If you have any useful Gatsby + GraphQL tips, please share them below in the comments!