Interested in reading this tutorial as one of many chapters in my advanced React with Firebase book? Checkout the entire The Road to Firebase book that teaches you to create business web applications without the need to create a backend application with a database yourself.
This tutorial is part 4 of 4 in this series.
So far, you have used a email/password combination to authenticated with the application. Firebase offers more than this sign in method. If you take a closer look at their documentation, you can find social sign in methods for Google, Facebook, Twitter and others. In this section, I want to show you how to use these social logins to give users access to your application. It removes lots of friction to use your application, because not everyone wants to create a new account from scratch. Rather people tend more and more to use social logins for services and products.
Note: The following sections show API keys, secrets, URIs and other sensitive data that you shouldn't share with other people. They should be kept secret. That's why all the sensitive data shown in the following sections is fake.
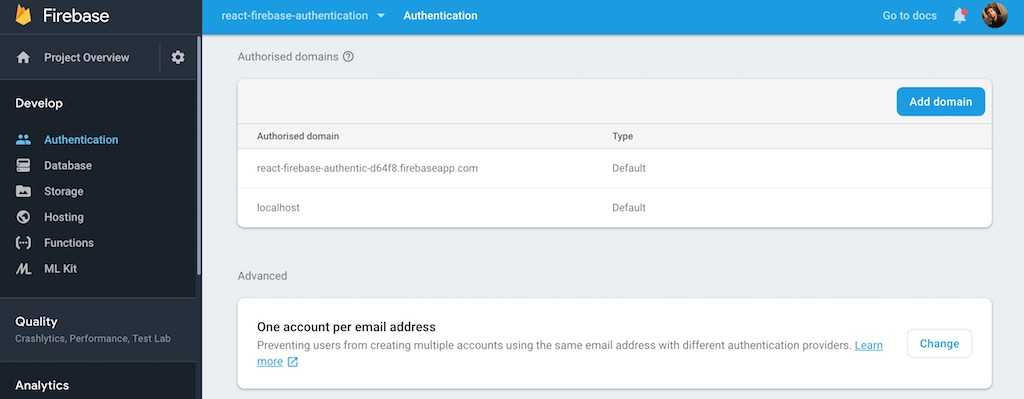
Firebase has the restriction to allow only one E-Mail address per user. If you try to use another sign in method next to the default email/password sign in method, you may see the following error: "An account already exists with the same email address but different sign in credentials. Sign in using a provider associated with this email address." It's because your E-Mail address from your Google account may be the same as for Facebook account or your default email/password combination. In order to overcome this behavior, only for this section though, you can deactivate it in your Firebase dashboard on the Authentication tab. There you can allow more than one account for the same E-Mail address:

Keep in mind that we will revert this configuration later though, because you don't want to create a dedicated user account for each social login in the end. It would mean that someone creating content with their Facebook social login wouldn't own the content with their Google social login anymore, because it's a different account. However, let's create the social logins this way first and see how we can merge them into one account later.
Troubleshoot Firebase Social Logins
There are a few errors that could show up for while setting up Google, Facebook or Twitter social logins for your application. First, understand the error message yourself and try to figure out the fix for it. However, I want to document a few things I have noticed myself and how I fixed them. If you encounter any of these issues, check again this troubleshooting area. Let's see what kind of errors we have and how to fix them:
Info: The current domain is not authorized for OAuth operations. This will prevent signInWithPopup, signInWithRedirect, linkWithPopup and linkWithRedirect from working. Add your domain (localhost) to the OAuth redirect domains list in the Firebase console -> Auth section -> Sign in method tab.
On your Firebase dashboard, you will find an Authentication tab to get a list of all your authenticated users, sign up methods and other configuration. Click the Authentication tab and scroll down to "Authorised domains" and add "localhost" there. Then your development domain should be authorized to perform the Auth operations with third-parties.

It's a mandatory configuration for most of Firebase's sign in methods. However, it can be that this alone doesn't help and you need to perform further configuration. Therefore, visit Google's Developer Console and select your Firebase project in the top-level navigation and navigate to "Credentials" afterward.
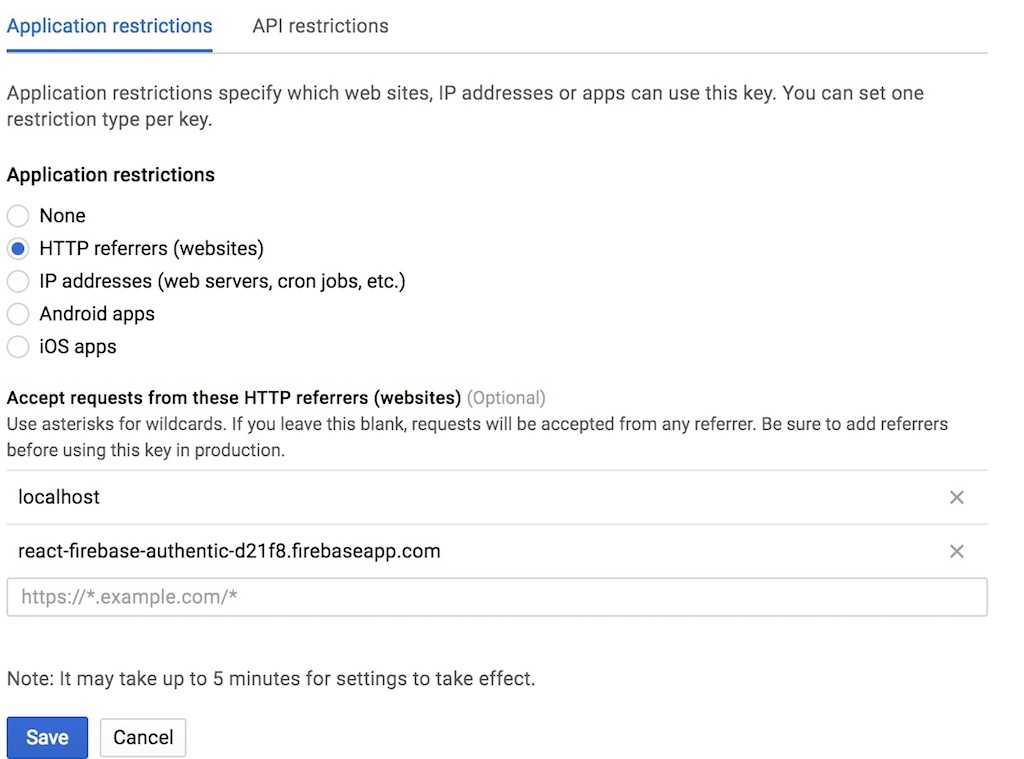
There you will see configuration for "API keys" and "OAuth 2.0 client IDs". In "API keys", edit "Browser key (auto created by Google Service)" and add localhost and the authDomain from your project's configuration in "Accept requests from these HTTP referrers (websites)".

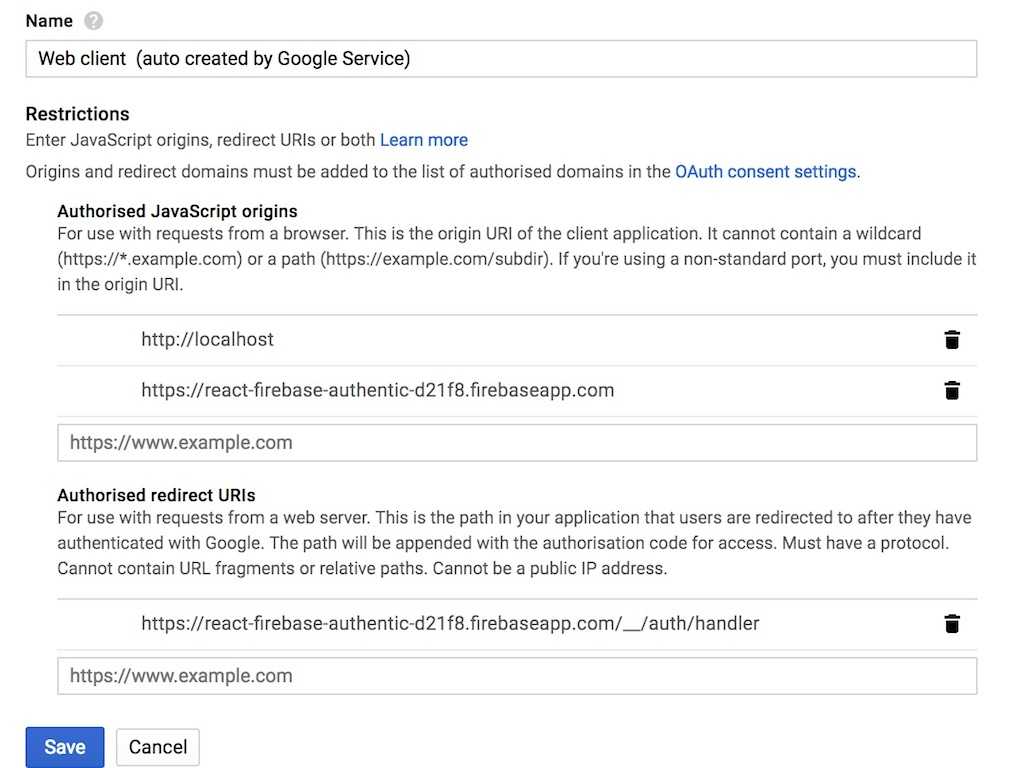
Next, in "OAuth 2.0 client IDs", edit "Web client (auto created by Google Service)" and add localhost and the authDomain from your project's configuration in "Authorised JavaScript origins".

It can take some time until the changes are propagated through Google's services (e.g. Firebase). But then all third-parties should be authorised to access your Firebase project.
Firebase Google Social Login
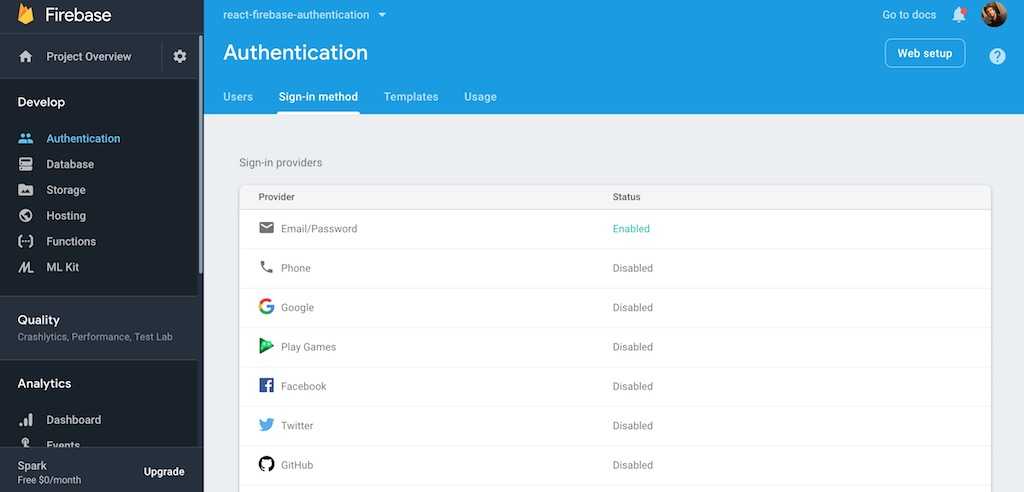
Before we can start to code the social login for Google with Firebase in React, we need to enable it as sign in method on our Firebase project's dashboard. You can find all your sign in methods under the "Authentication" tab.

Afterward, we are able to implement the social login in our code. In the Firebase class that's our interface between our React application and the Firebase API, add the Google Authentication Provider and the class method to sign in with Google by using the provider:
...class Firebase {constructor() {app.initializeApp(config);this.auth = app.auth();this.db = app.database();this.googleProvider = new app.auth.GoogleAuthProvider();}// *** Auth API ***doCreateUserWithEmailAndPassword = (email, password) =>this.auth.createUserWithEmailAndPassword(email, password);doSignInWithEmailAndPassword = (email, password) =>this.auth.signInWithEmailAndPassword(email, password);doSignInWithGoogle = () =>this.auth.signInWithPopup(this.googleProvider);doSignOut = () => this.auth.signOut();...}export default Firebase;
On your sign in page, add a new component for a sign in with Google next to your email/password sign in:
...const SignInPage = () => (<div><h1>SignIn</h1><SignInForm /><SignInGoogle /><PasswordForgetLink /><SignUpLink /></div>);...
Now implement the complete new form component in this same file for the Google sign in:
...class SignInGoogleBase extends Component {constructor(props) {super(props);this.state = { error: null };}onSubmit = event => {this.props.firebase.doSignInWithGoogle().then(socialAuthUser => {this.setState({ error: null });this.props.history.push(ROUTES.HOME);}).catch(error => {this.setState({ error });});event.preventDefault();};render() {const { error } = this.state;return (<form onSubmit={this.onSubmit}><button type="submit">Sign In with Google</button>{error && <p>{error.message}</p>}</form>);}}...
On submit the form component uses the new Google sign in method given by our Firebase's class instance. In order to pass Firebase and all other required configuration (e.g. history for a redirect after login) to this component, enhance it with all the needed higher-order components:
...const SignInForm = compose(withRouter,withFirebase,)(SignInFormBase);const SignInGoogle = compose(withRouter,withFirebase,)(SignInGoogleBase);export default SignInPage;export { SignInForm, SignInGoogle };
So far, that should do the trick for the sign in with Google sign in method. You will have an authenticated user afterward, but what's missing is the database user that you have to create yourself. It's similar to the sign up (registration) in the SignUpForm component:
...class SignInGoogleBase extends Component {...onSubmit = event => {this.props.firebase.doSignInWithGoogle().then(socialAuthUser => {// Create a user in your Firebase Realtime Database tooreturn this.props.firebase.user(socialAuthUser.user.uid).set({username: socialAuthUser.user.displayName,email: socialAuthUser.user.email,roles: {},});}).then(() => {this.setState({ error: null });this.props.history.push(ROUTES.HOME);}).catch(error => {this.setState({ error });});event.preventDefault();};...}...
In this scenario, every time a user signs in with Google, a new user with this stable id coming from the social login is created in your database. Basically if a user signs in twice with the same social login, the old user gets overridden. This can be a desired behavior, because maybe a user has changed their username on Google and want to see it reflected in your applications's database too. If you don't want to have this behavior and only create the user once with a social login, make use of the socialuser.additionalUserInfo.isNewUser property to only create a new user when signing in with Google for the first time.
Exercises:
- Read more about the Google Social Login
- Check your Firebase's Dashboard Authentication/Database tabs to manage your users (e.g. manually remove users).
- Confirm your source code for the last section
Firebase Facebook Social Login
Identical to the previous social login, enable the sign in method on your Firebase dashboard for Facebook. The Facebook social login expects an App ID and and App Secret. You can get these by creating a new Facebook App with your Facebook Account for this Firebase in React application. Afterward, you can find the App ID and App Secret for your new Facebook App.
Afterward, we are able to implement the social login in our code. In the Firebase class, add the Facebook Authentication Provider and the class method to sign in with Facebook by using the provider:
...class Firebase {constructor() {app.initializeApp(config);this.auth = app.auth();this.db = app.database();this.googleProvider = new app.auth.GoogleAuthProvider();this.facebookProvider = new app.auth.FacebookAuthProvider();}// *** Auth API ***doCreateUserWithEmailAndPassword = (email, password) =>this.auth.createUserWithEmailAndPassword(email, password);doSignInWithEmailAndPassword = (email, password) =>this.auth.signInWithEmailAndPassword(email, password);doSignInWithGoogle = () =>this.auth.signInWithPopup(this.googleProvider);doSignInWithFacebook = () =>this.auth.signInWithPopup(this.facebookProvider);doSignOut = () => this.auth.signOut();...}export default Firebase;
On your sign in page, add a new component for a sign in with Facebook next to your email/password and Google sign ins:
...const SignInPage = () => (<div><h1>SignIn</h1><SignInForm /><SignInGoogle /><SignInFacebook /><PasswordForgetLink /><SignUpLink /></div>);...
Now implement the complete new form component in this same file for the Facebook sign in:
...class SignInFacebookBase extends Component {constructor(props) {super(props);this.state = { error: null };}onSubmit = event => {this.props.firebase.doSignInWithFacebook().then(socialAuthUser => {this.setState({ error: null });this.props.history.push(ROUTES.HOME);}).catch(error => {this.setState({ error });});event.preventDefault();};render() {const { error } = this.state;return (<form onSubmit={this.onSubmit}><button type="submit">Sign In with Facebook</button>{error && <p>{error.message}</p>}</form>);}}...
On submit the form component uses the new Facebook sign in method given by our Firebase's class instance. In order to pass Firebase and all other required configuration to this component, enhance it with all the needed higher-order components:
...const SignInGoogle = compose(withRouter,withFirebase,)(SignInGoogleBase);const SignInFacebook = compose(withRouter,withFirebase,)(SignInFacebookBase);export default SignInPage;export { SignInForm, SignInGoogle, SignInFacebook };
You will have an authenticated user afterward, but what's missing again is the database user that you have to create yourself:
...class SignInFacebookBase extends Component {...onSubmit = event => {this.props.firebase.doSignInWithFacebook().then(socialAuthUser => {// Create a user in your Firebase Realtime Database tooreturn this.props.firebase.user(socialAuthUser.user.uid).set({username: socialAuthUser.additionalUserInfo.profile.name,email: socialAuthUser.additionalUserInfo.profile.email,roles: {},});}).then(() => {this.setState({ error: null });this.props.history.push(ROUTES.HOME);}).catch(error => {this.setState({ error });});event.preventDefault();};...}...
Again, every time a user signs in with Facebook, a new user with this stable id coming from the social login is created in your database. Basically if a user signs in twice with the same social login, the old user gets overridden. You can optionally make use of the socialuser.additionalUserInfo.isNewUser property to only create a new user when signing in with Facebook for the first time.
Exercises:
- Read more about the Facebook Social Login
- Figure out whether there is a way to interact with Facebook's API afterward, because the
socialUserhas anaccessTokenin itscredentialsobject. - Like my Facebook page to receive latest tutorials for web developers.
- Confirm your source code for the last section
Firebase Twitter Social Login
Identical to the previous social logins, enable the sign in method on your Firebase dashboard for Twitter. The Twitter social login expects an API key and API secret. You can get these by creating a new Twitter App with your Twitter Account for this Firebase in React application. Afterward, you can find the API key and API secret for your new Twitter App.
Now, we are able to implement the social login in our code. In the Firebase class, add the Twitter Authentication Provider and the class method to sign in with Twitter by using the provider:
...class Firebase {constructor() {app.initializeApp(config);this.auth = app.auth();this.db = app.database();this.googleProvider = new app.auth.GoogleAuthProvider();this.facebookProvider = new app.auth.FacebookAuthProvider();this.twitterProvider = new app.auth.TwitterAuthProvider();}// *** Auth API ***...doSignInWithGoogle = () =>this.auth.signInWithPopup(this.googleProvider);doSignInWithFacebook = () =>this.auth.signInWithPopup(this.facebookProvider);doSignInWithTwitter = () =>this.auth.signInWithPopup(this.twitterProvider);doSignOut = () => this.auth.signOut();...}export default Firebase;
On your sign in page, add a new component for a sign in with Twitter next to your email/password, Google and Facebook sign ins:
...const SignInPage = () => (<div><h1>SignIn</h1><SignInForm /><SignInGoogle /><SignInFacebook /><SignInTwitter /><PasswordForgetLink /><SignUpLink /></div>);...
Now implement the complete new form component in this same file for the Twitter sign in:
...class SignInTwitterBase extends Component {constructor(props) {super(props);this.state = { error: null };}onSubmit = event => {this.props.firebase.doSignInWithTwitter().then(socialAuthUser => {this.setState({ error: null });this.props.history.push(ROUTES.HOME);}).catch(error => {this.setState({ error });});event.preventDefault();};render() {const { error } = this.state;return (<form onSubmit={this.onSubmit}><button type="submit">Sign In with Twitter</button>{error && <p>{error.message}</p>}</form>);}}...
On submit the form component uses the new Twitter sign in method given by our Firebase's class instance. In order to pass Firebase and all other required configuration to this component, enhance it with all the needed higher-order components:
...const SignInFacebook = compose(withRouter,withFirebase,)(SignInFacebookBase);const SignInTwitter = compose(withRouter,withFirebase,)(SignInTwitterBase);export default SignInPage;export { SignInForm, SignInGoogle, SignInFacebook, SignInTwitter };
You will have an authenticated user afterward, but what's missing again is the database user that you have to create yourself:
...class SignInTwitterBase extends Component {...onSubmit = event => {this.props.firebase.doSignInWithTwitter().then(socialAuthUser => {// Create a user in your Firebase Realtime Database tooreturn this.props.firebase.user(socialAuthUser.user.uid).set({username: socialAuthUser.additionalUserInfo.profile.name,email: socialAuthUser.additionalUserInfo.profile.email,roles: {},});}).then(() => {this.setState({ error: null });this.props.history.push(ROUTES.HOME);}).catch(error => {this.setState({ error });});event.preventDefault();};...}...
Again, every time a user signs in with Twitter, a new user with this stable id coming from the social login is created in your database. Basically if a user signs in twice with the same social login, the old user gets overridden. You can optionally make use of the socialuser.additionalUserInfo.isNewUser property to only create a new user when signing in with Twitter for the first time .
Exercises:
- Read more about the Twitter Social Login
- Figure out whether there is a way to interact with Twitter's API afterward, because the
socialUserhas anaccessTokenandsecretin itscredentialsobject. - Follow my Twitter page to receive latest tutorials for web developers.
- Confirm your source code for the last section